In solar installation and asset management, limited real-time visibility and fragmented field coordination quietly erode margins, delay projects, and compromise system performance. With MAPOG, you can have a real-time map which helps assign and track field tasks by linking work orders to precise locations, allowing managers to dispatch technicians based on proximity and monitoring job progress live with an integrated mobile user app supporting real-time updates, status reporting, and location tracking.
Key Concept of task map
Deliver a real-time, interactive view of all field tasks and team locations, enabling managers to assign work by proximity, track progress live, and adjust priorities instantly. By linking tasks to specific locations and integrating with a mobile app, teams not only achieve better coordination, but also faster response times, all from one centralized platform that keeps field operations organized and transparent.
Step-by-step method of creating the map
Step 1: Create custom location template – Task management
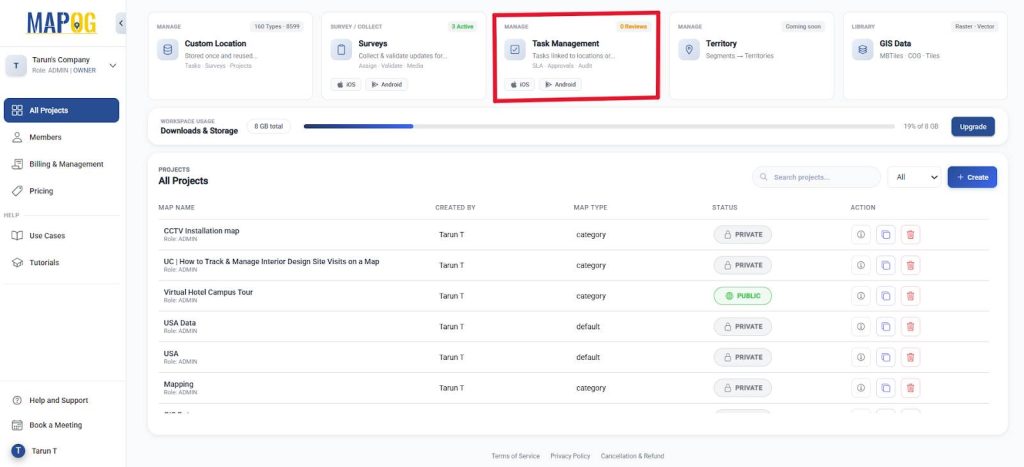
Click on “Task Management” on the MAPOG dashboard.
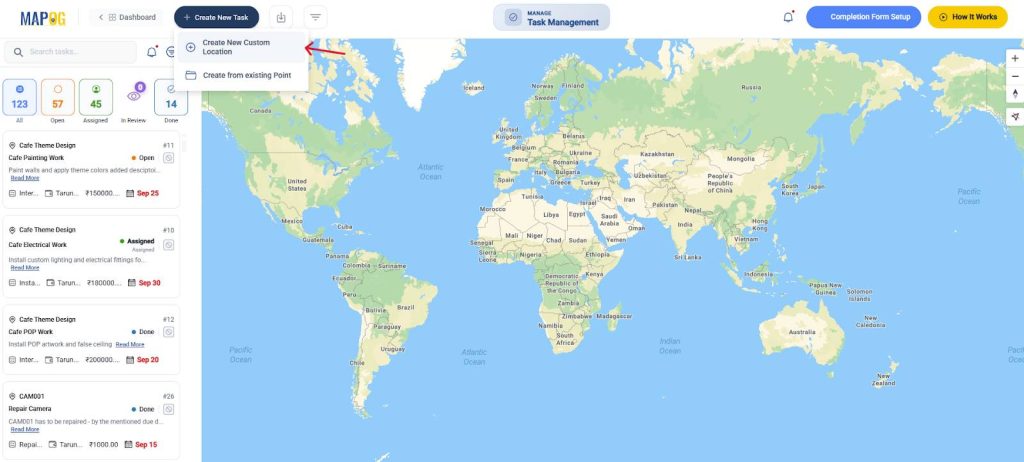
Further, click on ‘Create New Task’ and ‘Create New Custom Location’.
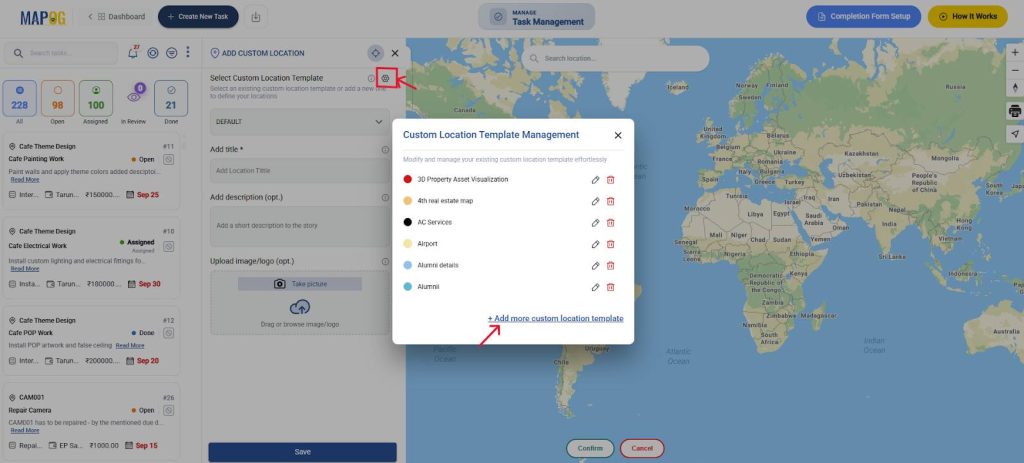
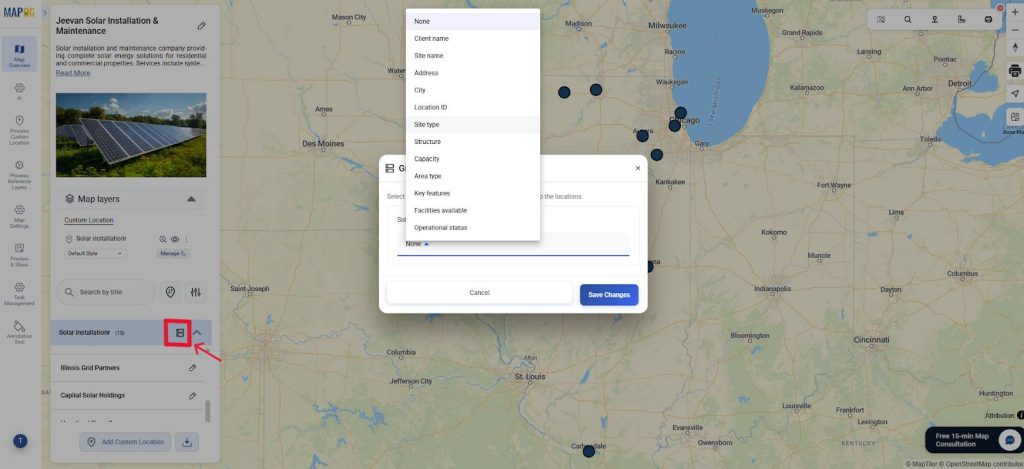
Go to custom location settings and click on add new custom location template. You can add your specific related attributes to each location using this.
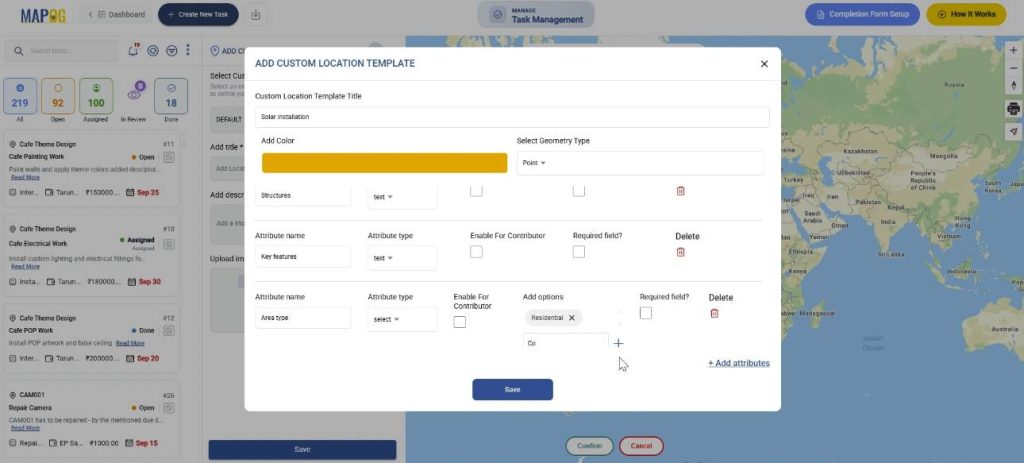
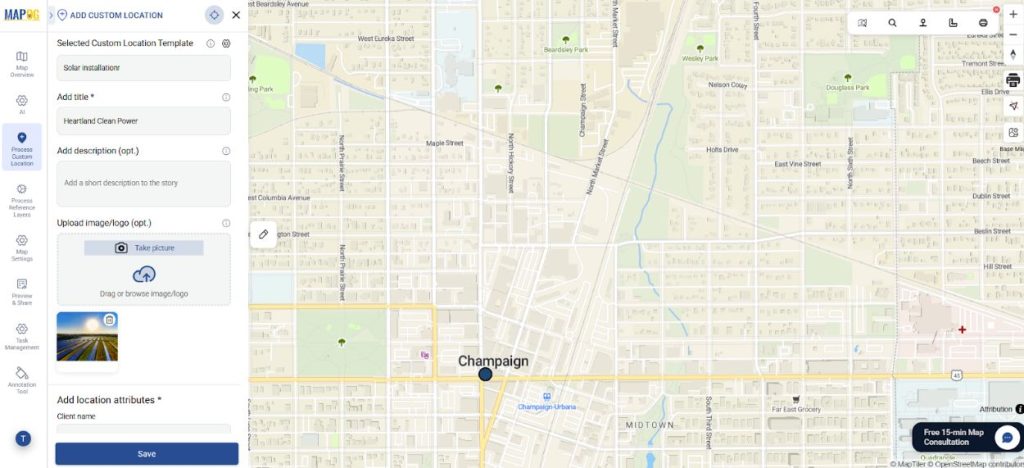
Create a custom location template. Give it a title, colour and select geometry as a point. Further, add attributes such as Location, area type and facilities, with text, select or multi-select, image options. It helps to structure & restore your attributes.
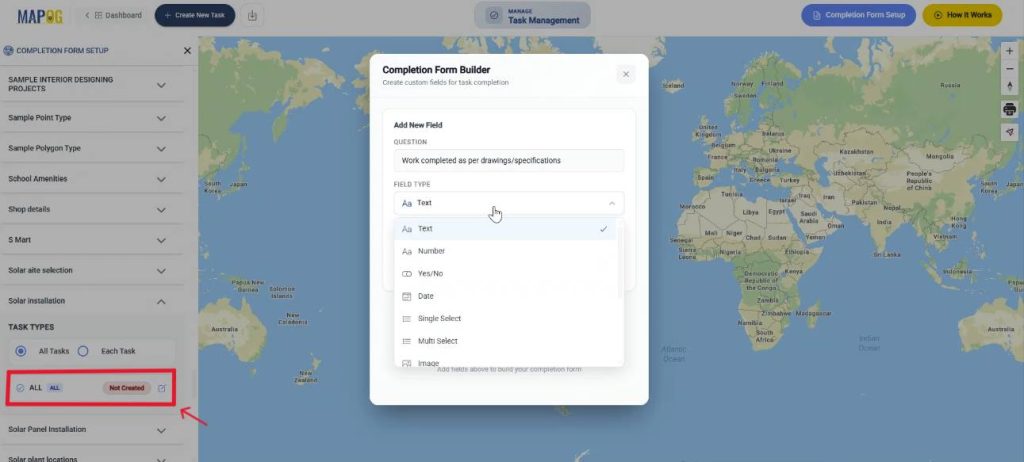
Step 2: Create a task completion form
Next, you can create a completion form to supervise the work. Start by navigating to the Completion Form setup in the top-right corner. Next, locate your custom location template on the left. Under Task Types, select all Tasks and build your own completion form. You can add a variety of questions with responses such as text, select, multi-select, yes/no, and even images.
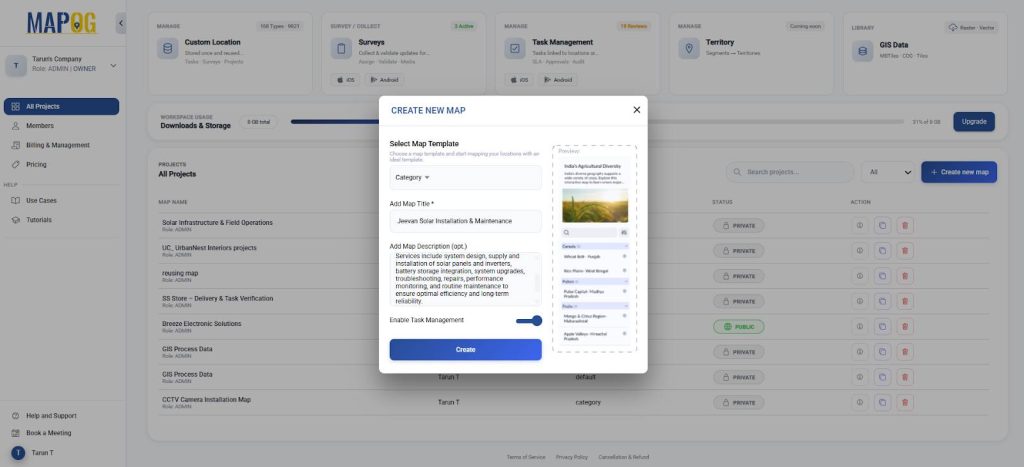
Step 3: Create the map
Go back to the dashboard and click “Create new map”. Further, select ‘Category’ as map template, add title and description. Finally, click Enable Task Management and Create.
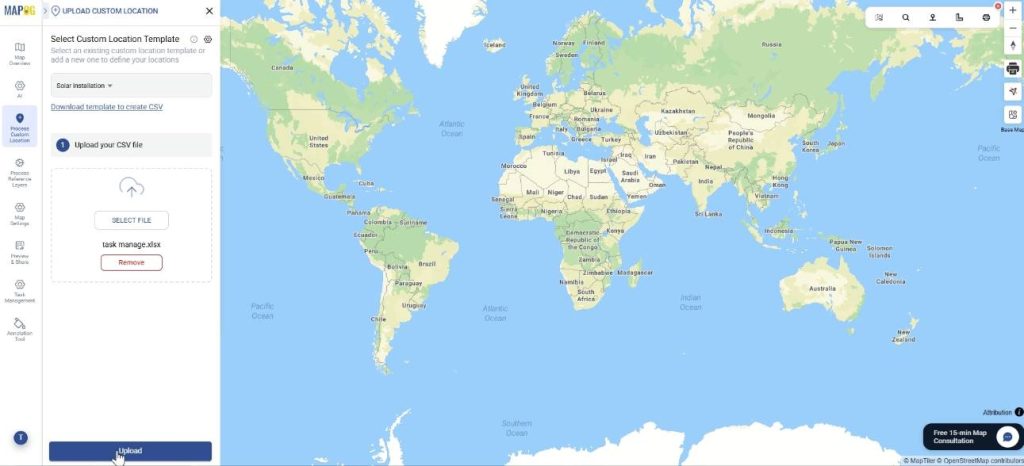
Step 4: Add custom location
Now, go to Process Custom location and click on add by uploading csv/excel, to upload all your attributes and location coordinates at once and select the custom location template that you recently created. Further, browse your file and upload.
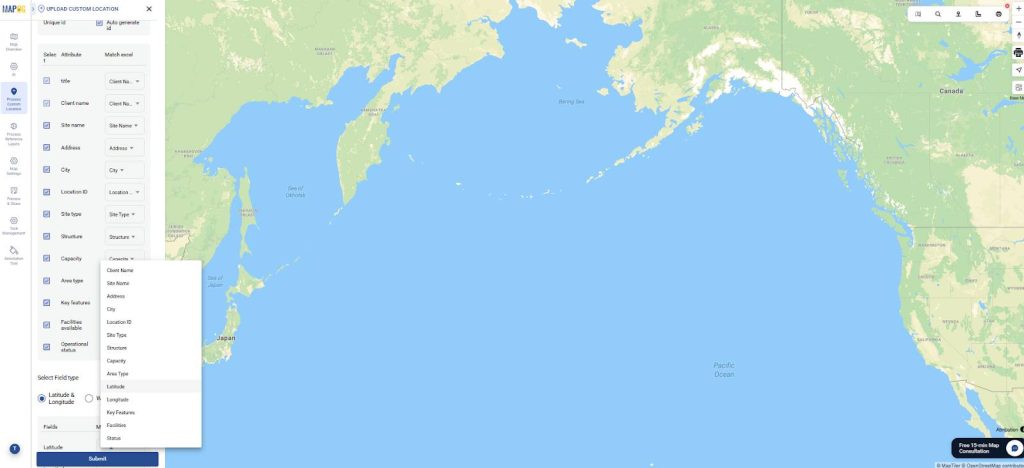
Now, define the location fields. Start with a unique ID, so that the location can be tracked reliably later on. Match attributes to excel columns along with field types like Latitude & Longitude and submit. Finally, your points will get auto-plotted on the map.
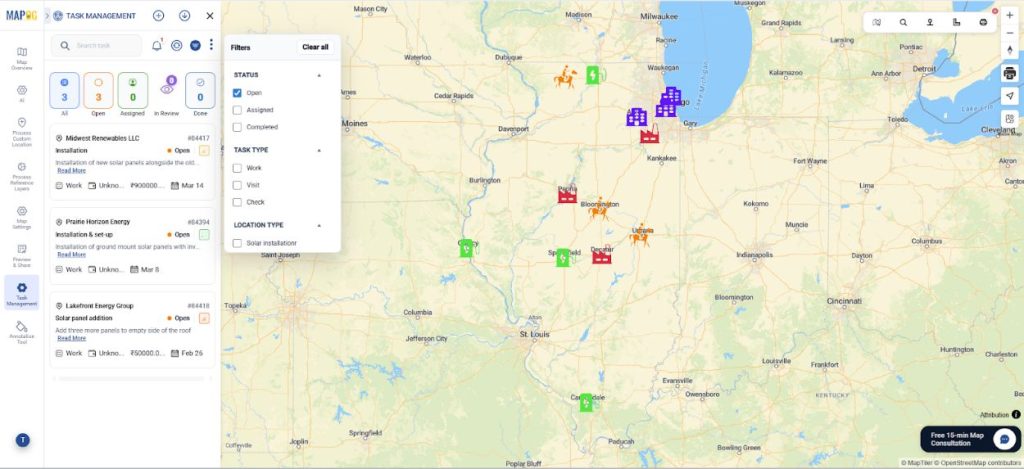
Step 5: Group By, Filter and Sort your locations.
Next, organize your custom locations using “Group by Attributes” to group your sites based on their type.
Use the Filter option to selectively view locations based on attribute types.
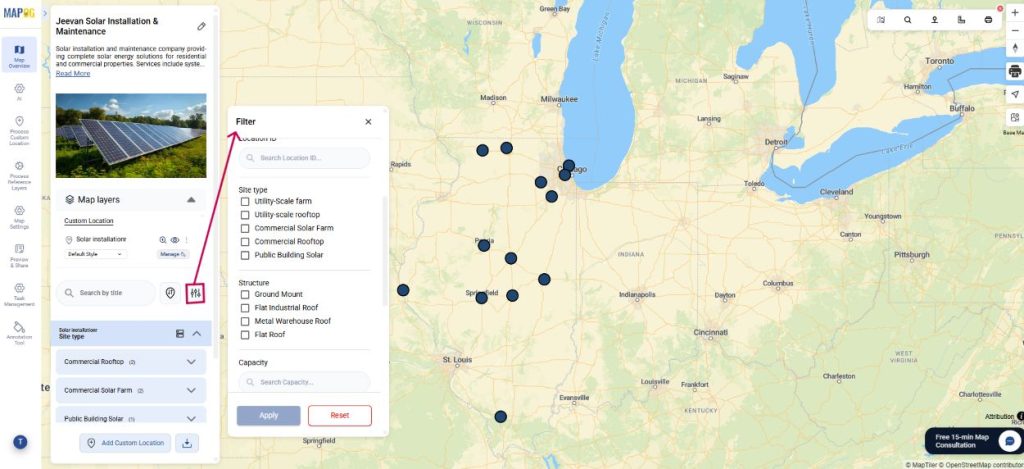
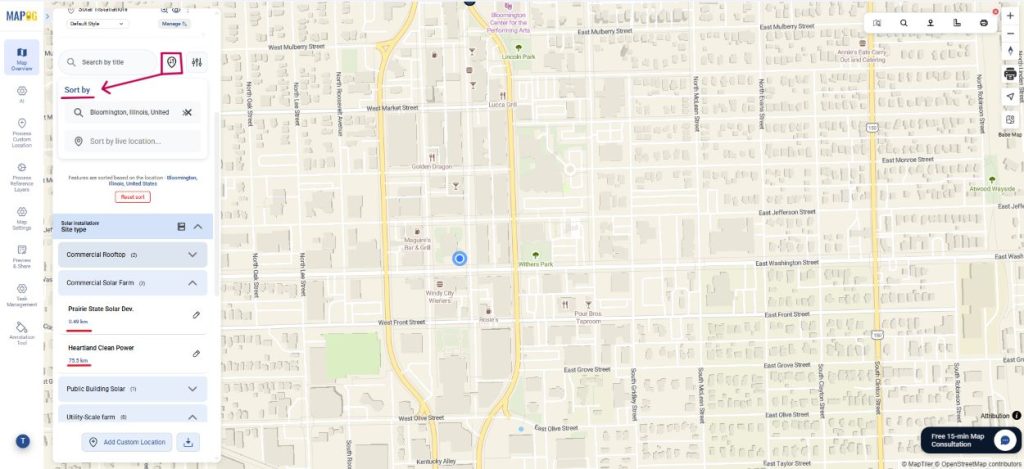
Finally, you can use ‘Sort by’ and view locations by live distance and prioritize visits by proximity.
Step 6: Edit customer location details
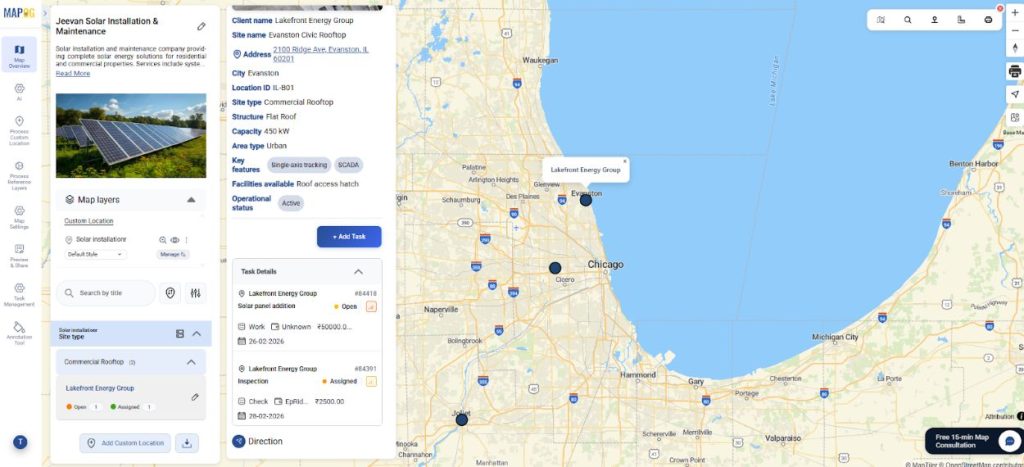
Optionally, edit location details. Go to edit custom location details.
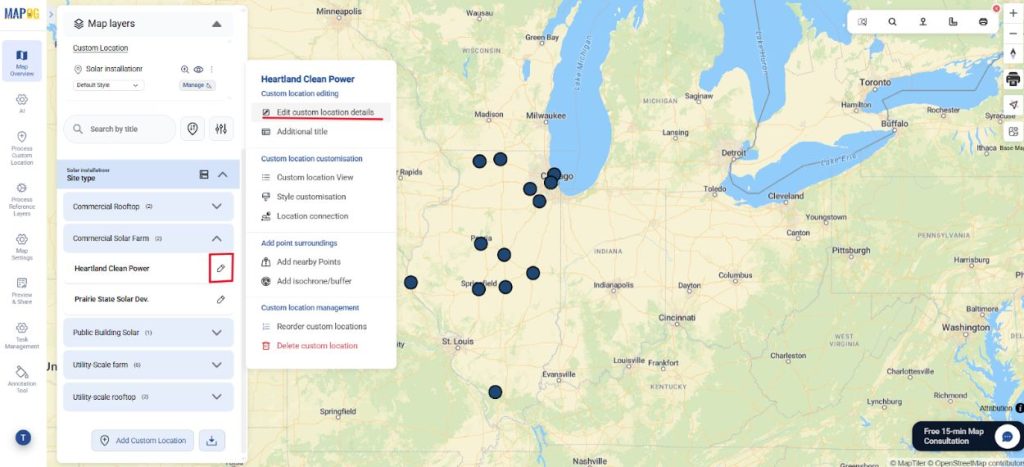
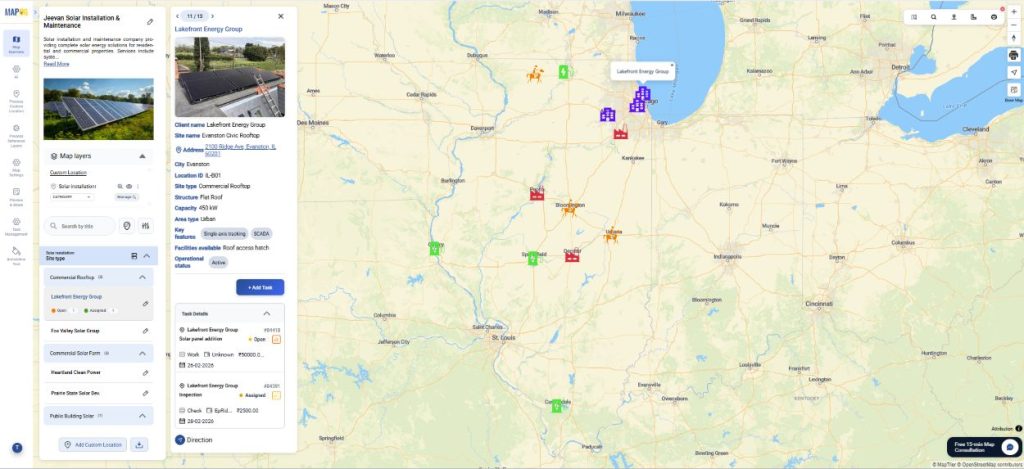
Here, you can customize details about each location like description, upload images or edit the location itself.
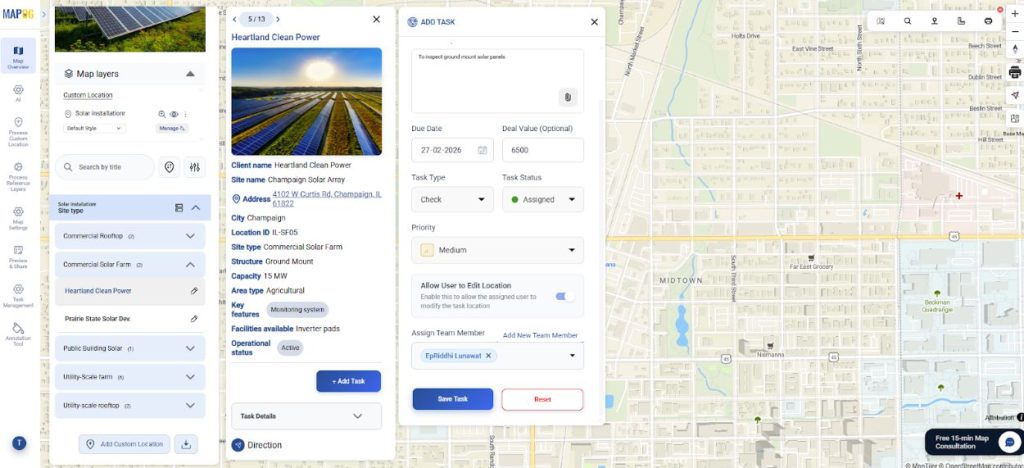
Step 7: Assign task to location
Now, click on the location and select Add Task. Further, give the task a title, description, due date and value. Also, select task status as open or assigned and set the task priority from urgent to low. Optionally, you can allow users to edit location.
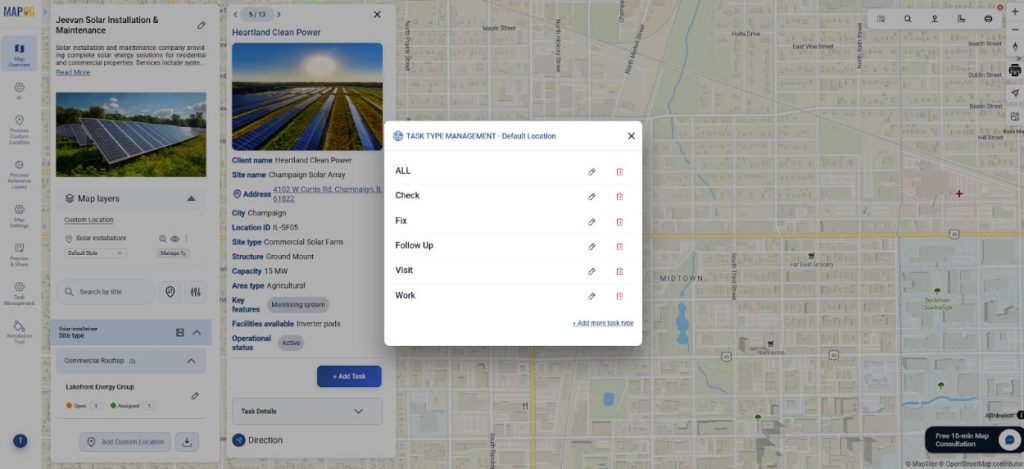
Next, go to Task Type, manage settings and add more task types that you can classify such as check up, fix, work etc. Just put the task type name and save them.
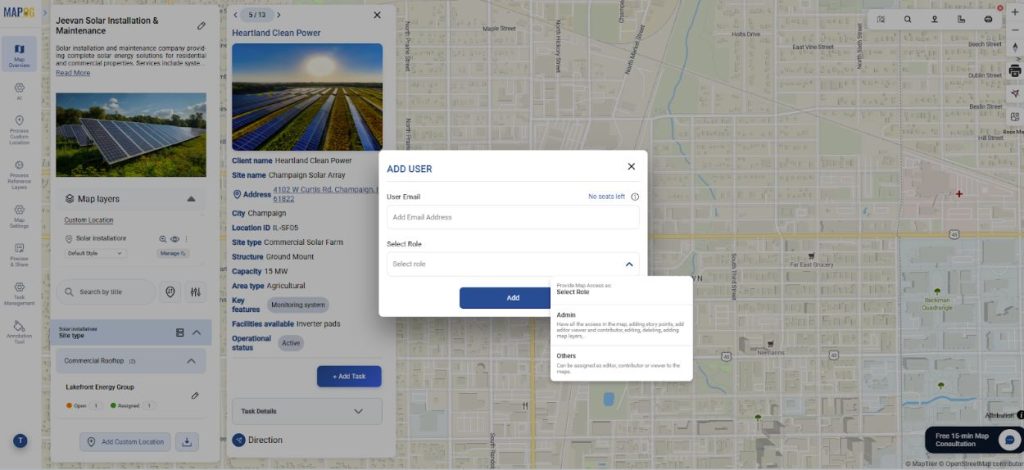
Assign the team members by using the add new member button, add email address and select the role such as admin or others.
Then, select the team member for the required task. Then save the task.
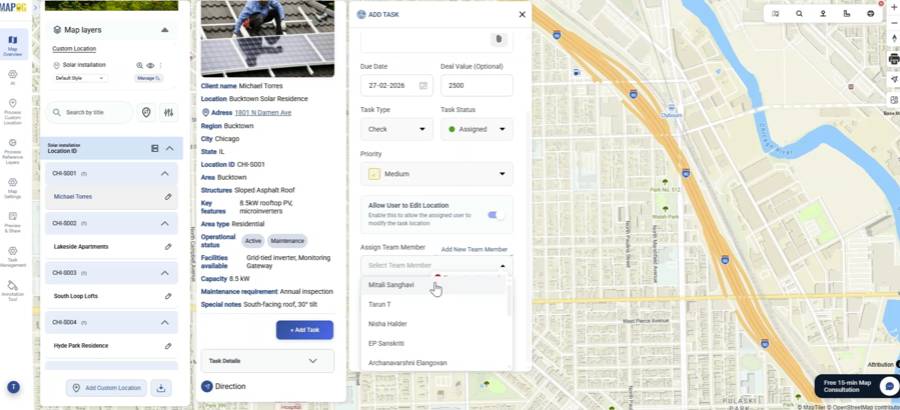
You can add multiple tasks to the same location as shown.
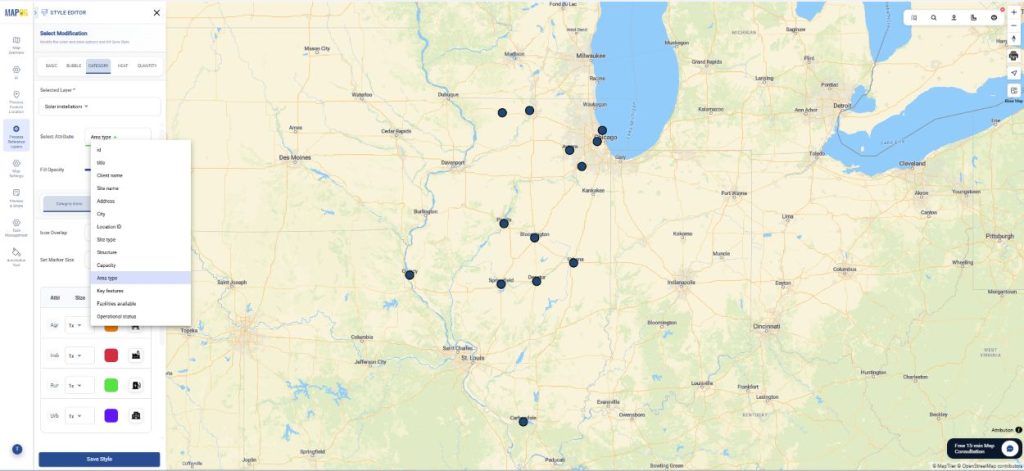
Step 8: Style custom location
Further, personalize each custom location. Go to Add style layer.
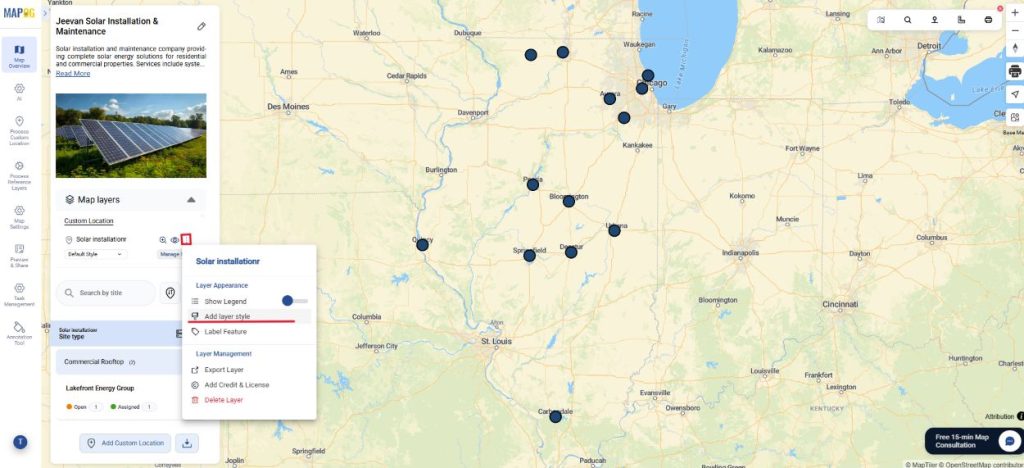
Now, choose ‘category’ and style according to different attributes. Choose icons, colours based on your requirement.
Step 9: The user interface for tasks
The assigned users can see tasks in the MAPOG Contributor app. They can view the tasks by table or map view and also filter them. Afterwards, they can update the status of work as started or on-hold, add comments and fill the task completion form, along with images of the task after completion.
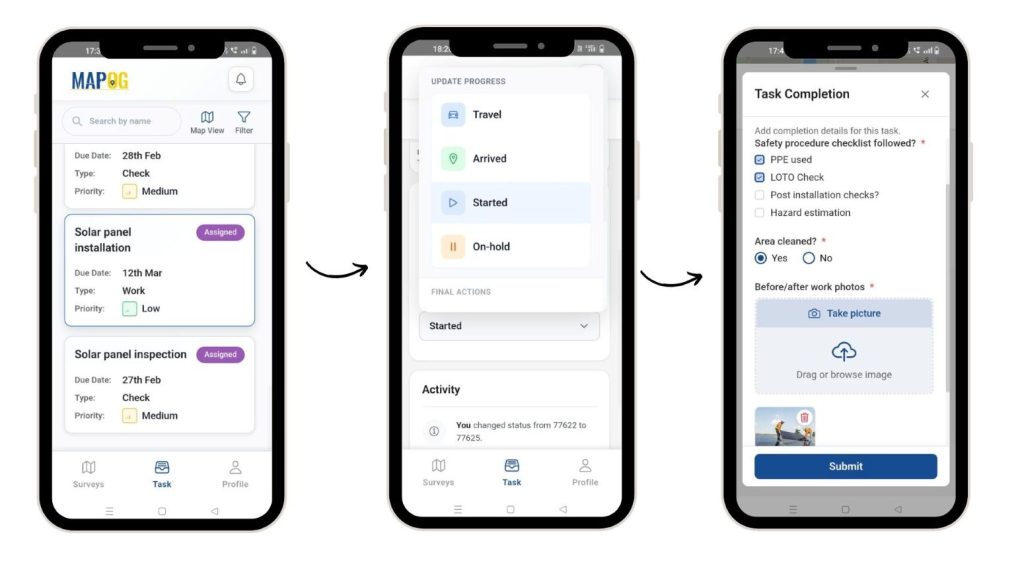
Step 10: Task Overview
Finally, you can view the tasks in the task management section. You can use the filter option and see them by priority, type or assignee.
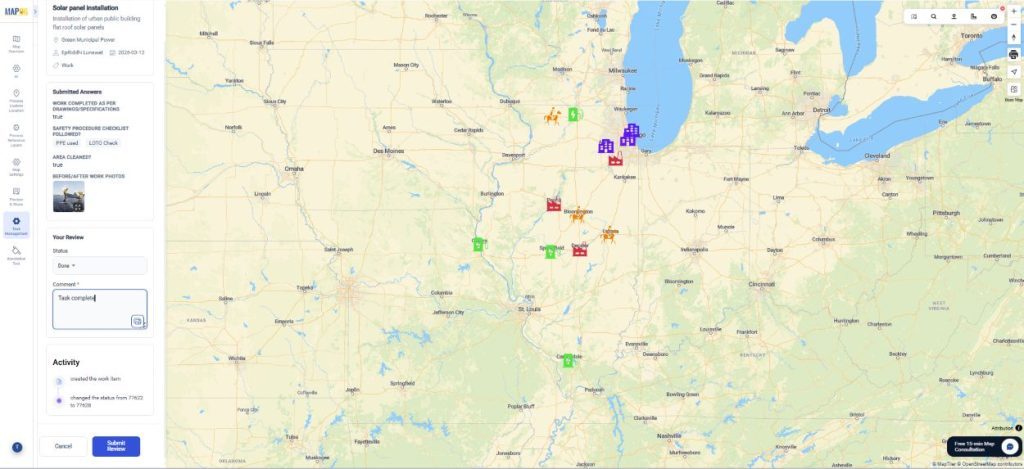
Further, once the task is complete and sent for review, you can submit review and mark as re-assign, cancel or done.
Industrial benefits
Effective field operations rely on real-time visibility and coordination across locations. Therefore, location-based maps help teams assign tasks by proximity, track progress live, and maintain oversight. In solar, logistics, construction, utilities, and telecom, they optimize routes, monitor teams and sites, and manage repairs or projects thereby making field task management proactive and data-driven through mobile integration.
Conclusion
With MAPOG, you can have real-time, location-based maps that help organizations assign, track, and manage field tasks efficiently, hence providing visibility, faster response, and smarter resource allocation across industries through mobile-integrated updates.