Running a CCTV Installation Map helps businesses manage hundreds of camera sites, clients, and service requests efficiently. Traditionally, companies relied on Excel sheets, WhatsApp chats, or handwritten registers, which made tracking installations confusing. But managing installations, clients, and service records in scattered places quickly becomes confusing. That’s where an interactive map comes in — a single platform to manage, track, and showcase everything.
The Key Concept Behind This Map
This project was built on one powerful idea:
Manage CCTV installations and maintenance on one interactive map.
Instead of scrolling through endless spreadsheets, you can now:
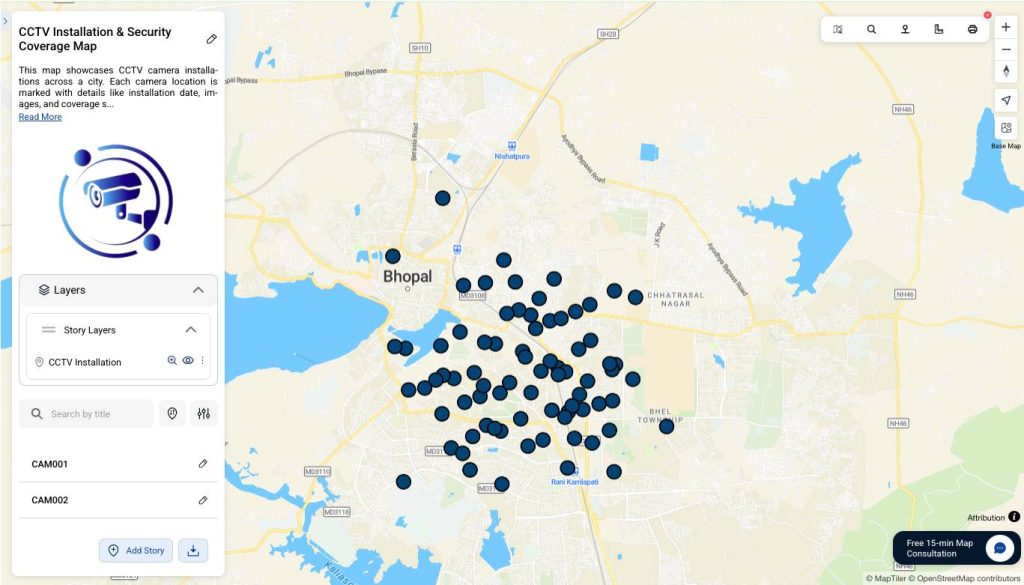
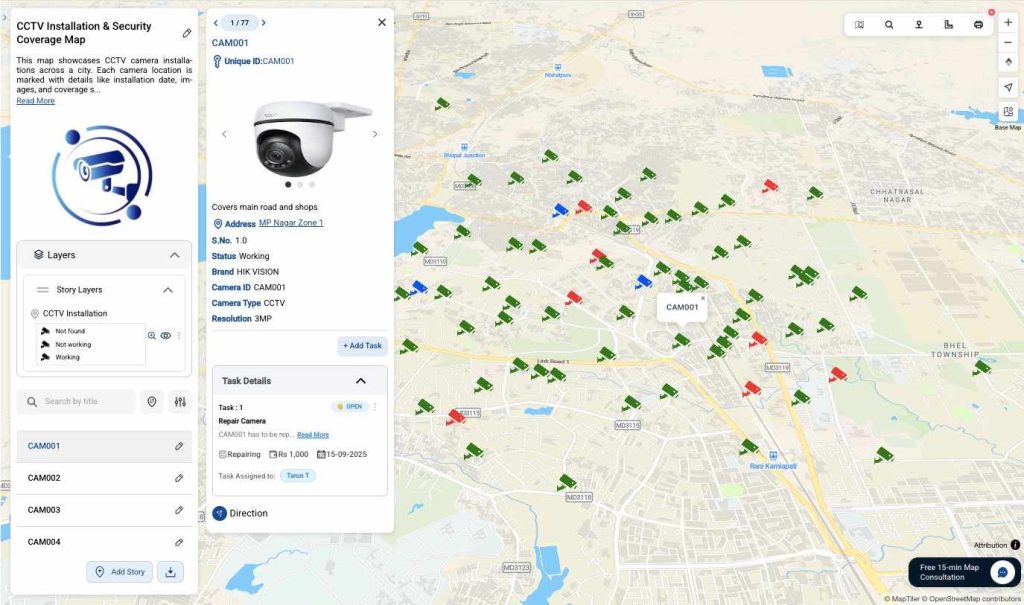
- See all your camera installations location-wise on a map
- Click on each pin to view complete installation details (address, camera ID, brand, resolution, status)
- Showcase your company’s work and scale to new clients and leads
- Assign and track team tasks in real-time
- Manage maintenance and follow-ups easily
This makes it especially powerful for installation companies, service providers, and security businesses.
Step-by-Step Process to Create the CCTV Installation Map
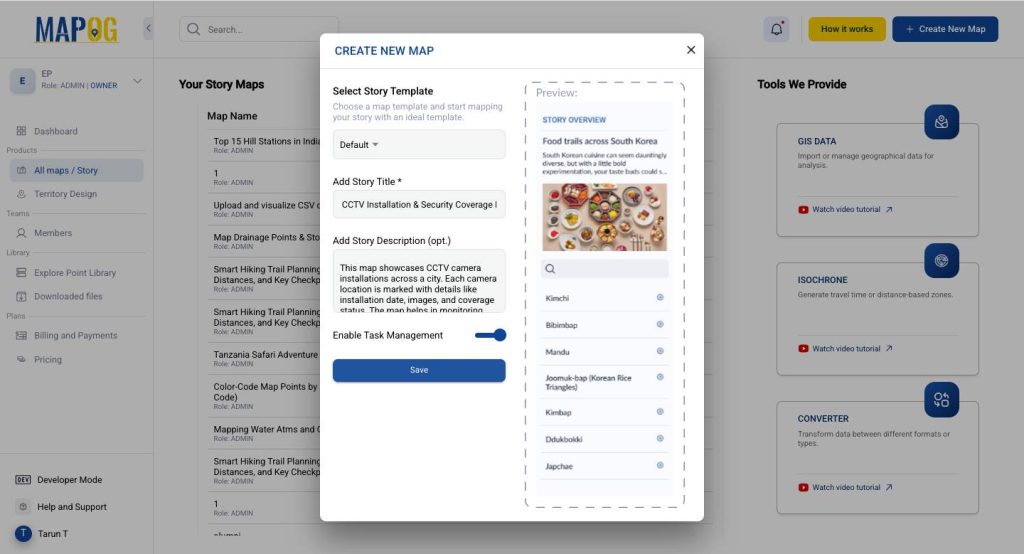
Step 1: Start a New Project
- Open MAPOG → click “Create New Map”
- Select the story template as Default Map
- Add a title (e.g. “CCTV Installation & Security Coverage Map”) and short description of your company’s work
- Enable Task Management and Hit Save
- Optionally, upload a cover image of your company branding.
This creates your base project where all CCTV locations will be managed.
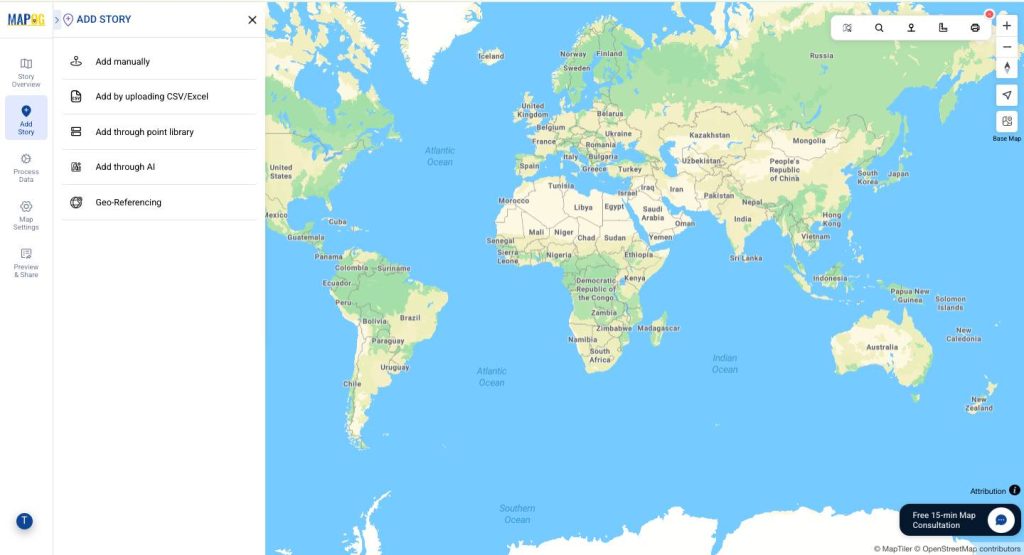
Step 2: Add CCTV Locations
- Go to Add Story
- Choose either:
- Add Manually → enter each CCTV one by one
- Upload CSV/Excel → bulk upload camera details (e.g., camera ID, address, status)
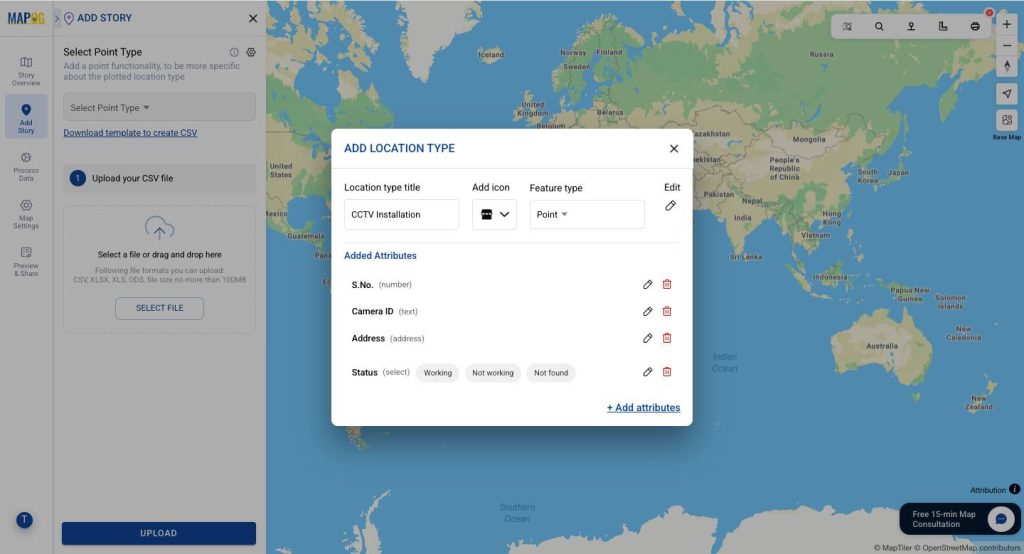
Step 3: Understand “Points” & Add Attributes
- In MAPOG, every CCTV location you add = Point
- Each point can store attributes (extra details about the CCTV) such as:
- Camera ID / Name
- Address
- Status (Working / Not Working / Not Found)
- Brand
- Camera Type
- Resolution
Think of attributes like “columns in Excel” but visible directly on the map pin.
Step 4 : Map & Visualise Data
- Select your location type and upload file

- Match Excel columns with attributes (e.g., Camera ID → Camera ID, Status → Status)
- For location placement, choose Latitude & Longitude (or WKT if available)
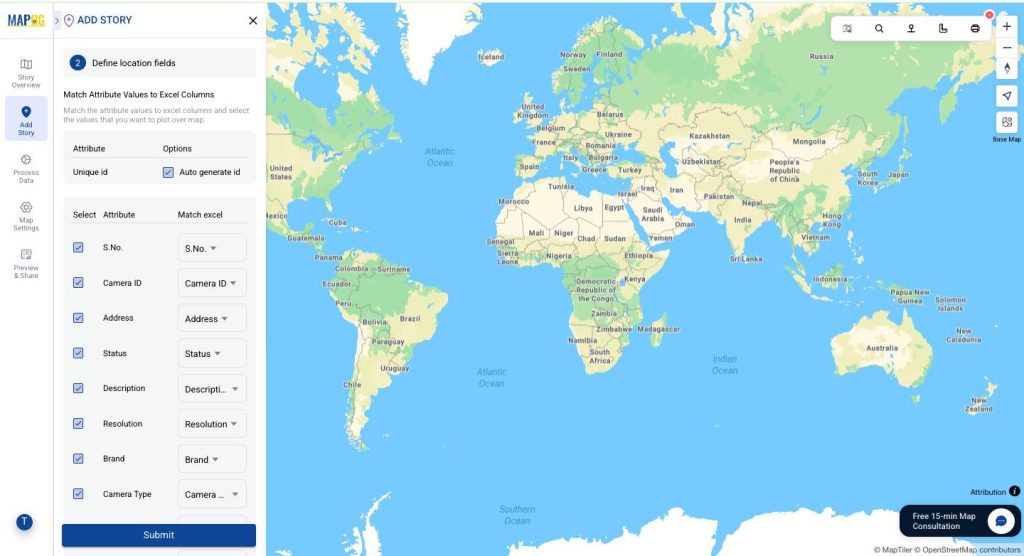
- Submit → All CCTV points now appear on your map
Step 5: Customise Your CCTV Map
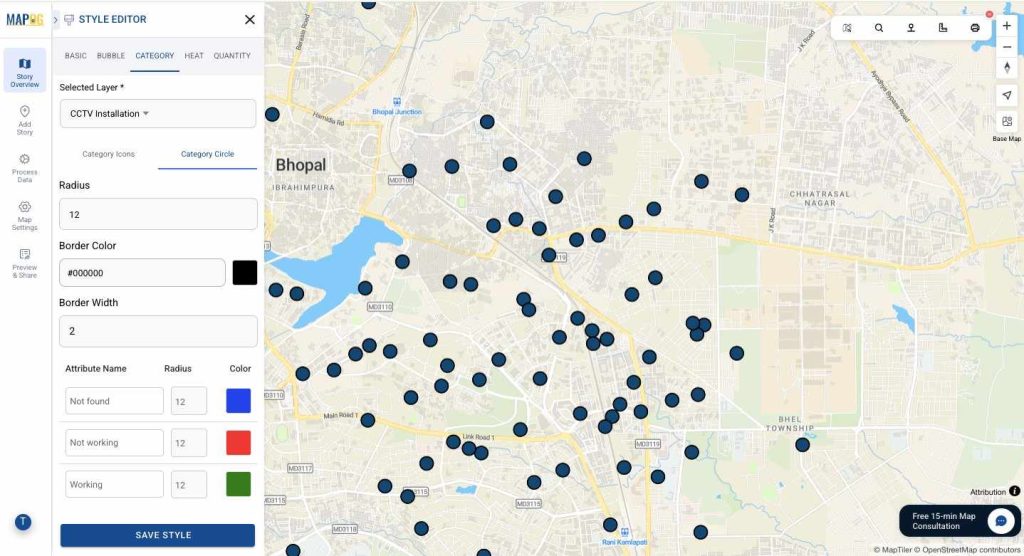
MAPOG allows you to style your CCTV points based on categories and status, making the map visually clear and professional.
Select the Story Layer (where your CCTV points are). Click the three dots (⋮) on the right panel. Choose Category Style > Select layer (Point type)> Select attribute (Status)> Choose Category Icons and Assign colours based on status/type and Hit Save.
- Green → Working
- Red → Not Working / Faulty
- Blue → Not Found
This approach makes your map easy to scan, helps your team track installations quickly, and provides a professional view for clients.
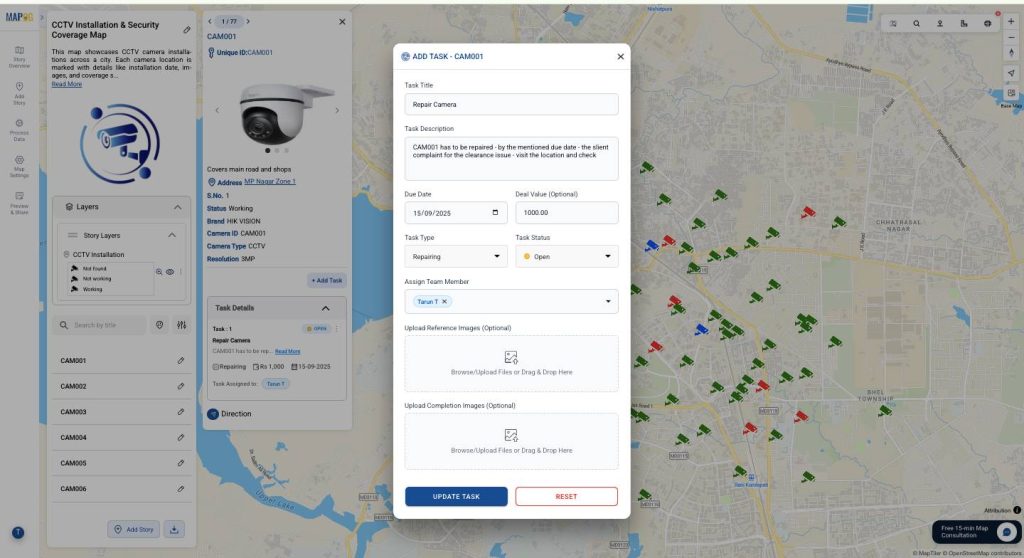
Step 6: Task & Point Management
MAPOG is not just for plotting — it also helps manage your business.
- Task Management → Assign jobs to your team
- Example: A camera in MP Nagar stops working
- You assign task “Repair CCTV-101” to Tarun with details + location
- Only you & Tarun can see this task
- Once he completes, he updates status to Completed
Now maintenance and client requests stay organized in one place.
Step 7 : Sorting for Nearby & Area-Wise Sites
MAPOG’s sorting feature makes it easy to track installations in the same area.
- Sort sites by location → quickly see how many installations are done in one area
- Saves travel time → plan multiple visits in a single round
Example: Suppose you are at MP Nagar, Zone 1. By sorting, you see more client sites within your reach. Instead of returning later, you can finish maintenance/follow-ups in the same trip.

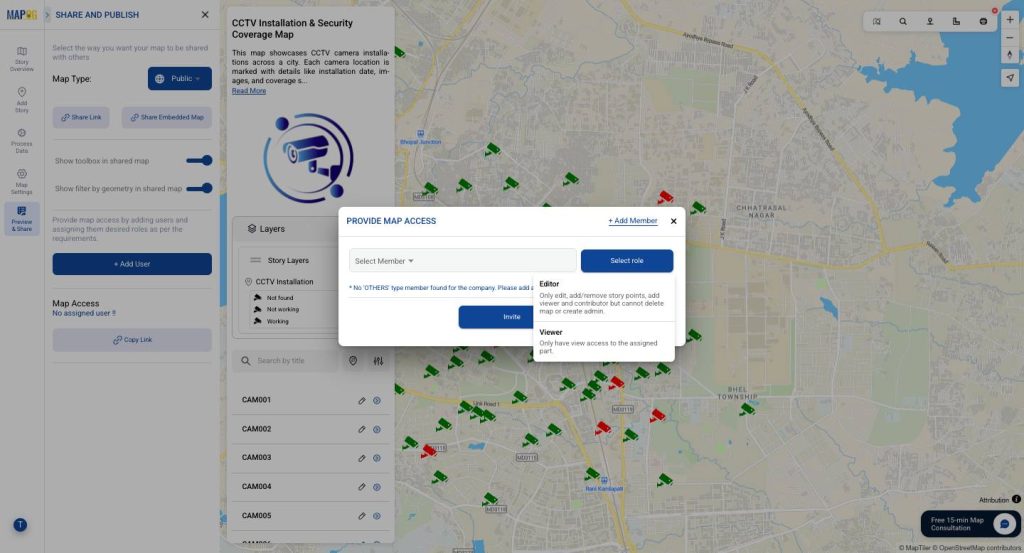
Step 8 : Preview & Share
Go to Preview & Share and choose how to use your map:
- Public → share link with clients
- Private → keep for internal monitoring with Editor and Viewer Roles
- Embedded → showcase on your website or reports
This turns your CCTV map into both a client showcase & internal management tool
Final Outcome – A Map That Powers Your CCTV Business
The result? A single interactive map where you can:
- Showcase your work to clients and leads
- Track all installations and their status
- Assign and manage tasks with your team
- Plan maintenance and follow-ups efficiently
Why Create Maps Like This?
- Showcase Scale & Work – Demonstrate your installations across the city or multiple cities
- Boost Client Trust – Clients see proof of your work visually
- Simplify Team Management – Assign and track tasks without messy spreadsheets
- Save Time & Reduce Errors – No more searching through chats or registers
- Easy to Build – No coding needed; anyone in your team can do it
Want to Create Your Own CCTV Installation Map?
You can build your own installation, maintenance, or service tracker map in just a few steps.
It could be for:
- CCTV installations
- Fire alarm setups
- Electrical fittings
- Solar panel maintenance
- Any service-based business with multiple sites
👉 Head to MAPOG and start building your own interactive map today.
Need help? Write to us at support@mapog.com — we’ll guide you through your first story!
Explore other Blogs :
Public Amenities Mapping with GIS: How Cities Can Improve Schools, Hospitals, Parks & Community Services
How Interactive Maps Drive Community Water, Energy, and Environmental Projects
How to Map Waste Bins, Collection Points & Recycling Centers to Improve Waste Management and Sustainability
How to List Flats, Villas & Commercial Properties on One Interactive Map