Struggling to Manage Retail Locations and Tasks across multiple plants, warehouses, or project sites? Traditional spreadsheets and emails often cause delays and poor visibility.
With MAPOG’s interactive map-based management, teams can visualize facilities, assign work orders, monitor progress, and update statuses in real time from one centralized, easy-to-use platform.
Key Concepts
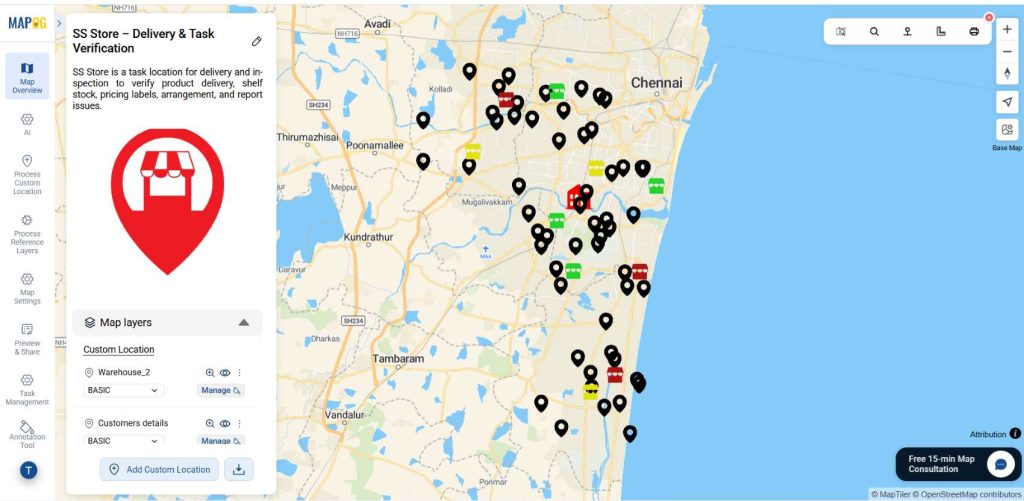
Managing retail store locations and tasks on a map isn’t just about pinning sites—it builds a centralized operations hub. Instead of juggling maintenance logs, emails, and task tools, teams can link every store, asset, and responsibility in one unified, easy-to-manage platform. With MAPOG, retail store teams can tag locations, set priorities, and track progress directly on the map. Whether it’s equipment inspections, preventive maintenance, safety audits, or installation work, each task is visually linked to its exact location.
Steps involves How to Manage Retail Locations and Tasks on a Map
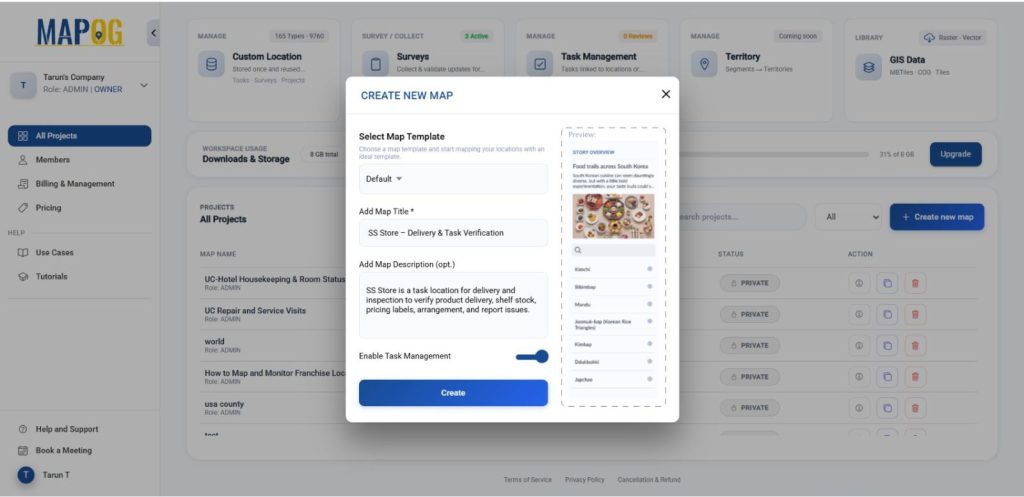
Step 1: Create a new map
First, head to MAPOG and click on “Create new map”. Then provide a title, description and enable task management, then click create to initialize your project.
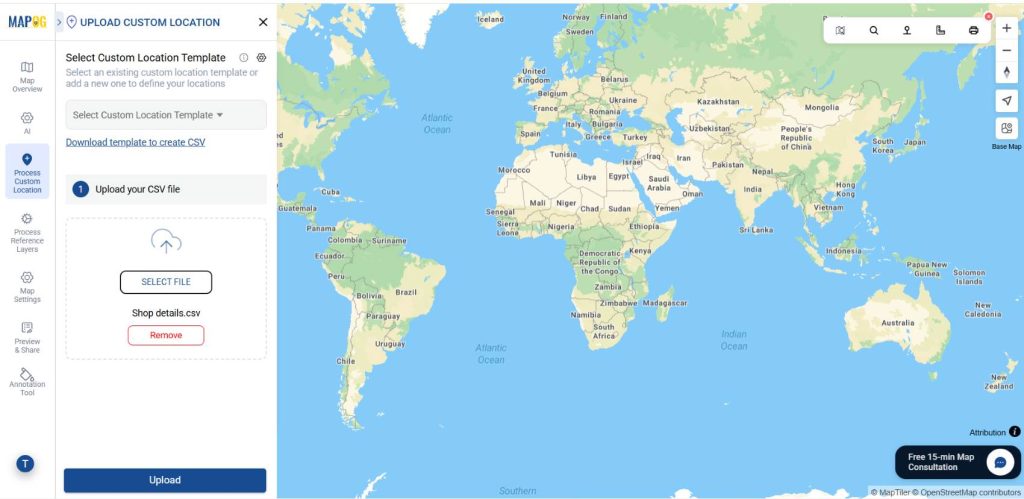
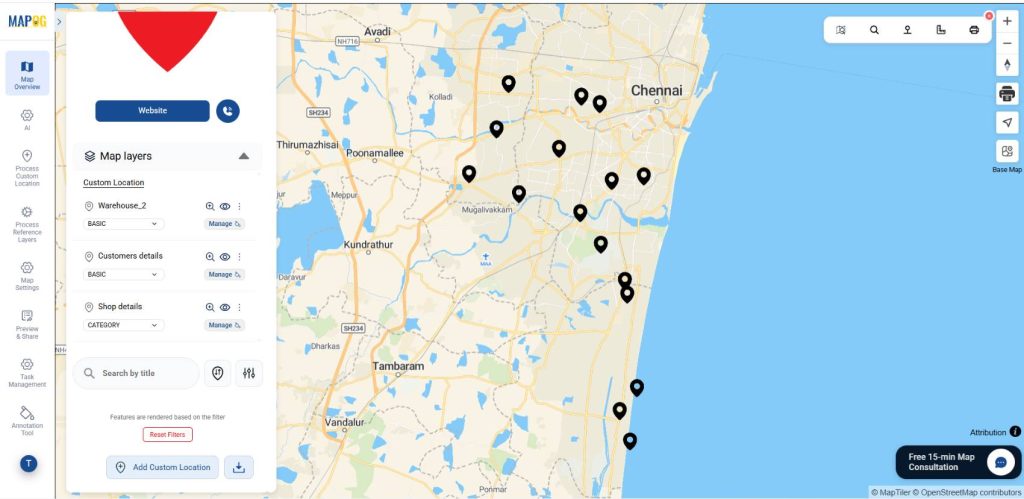
Now go to Process custom location then select Add by uploading CSV/Excel to add many locations to the map at once. Then drag the desirable excel file.
2. Add customer location template:
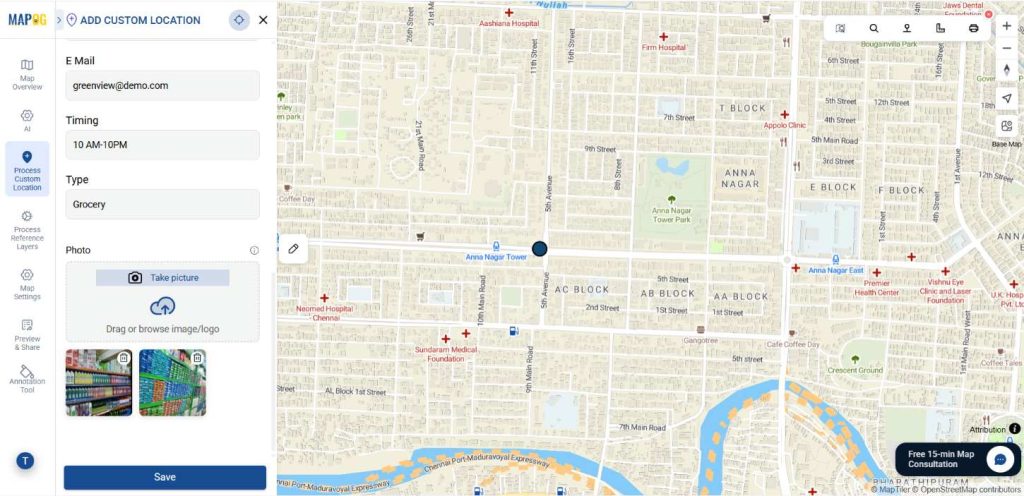
Open Select Custom Location Template, click Add More Custom Location Template, and customize details like “Shop Details,” address, photos, and more. This keeps data consistent and reusable for future maps. Once configured, proceed to upload.
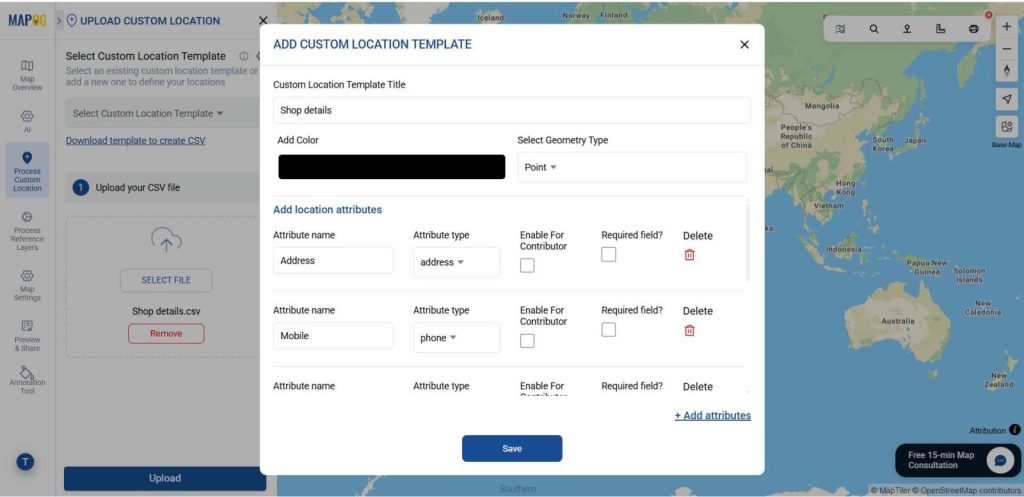
Make sure to set a Unique ID, this helps in proper data handling by identifying each location uniquely and managing updates efficiently.
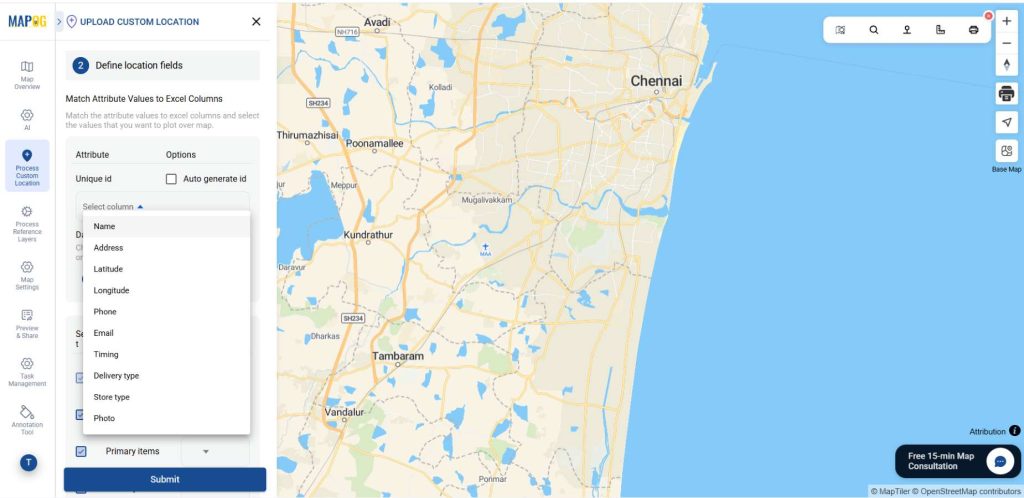
Later match the name, contact number, timings, Store name and description column with excel attributes. In the select field type give latitude & give longitude, then hit submit. All your customer locations will auto plot on map.

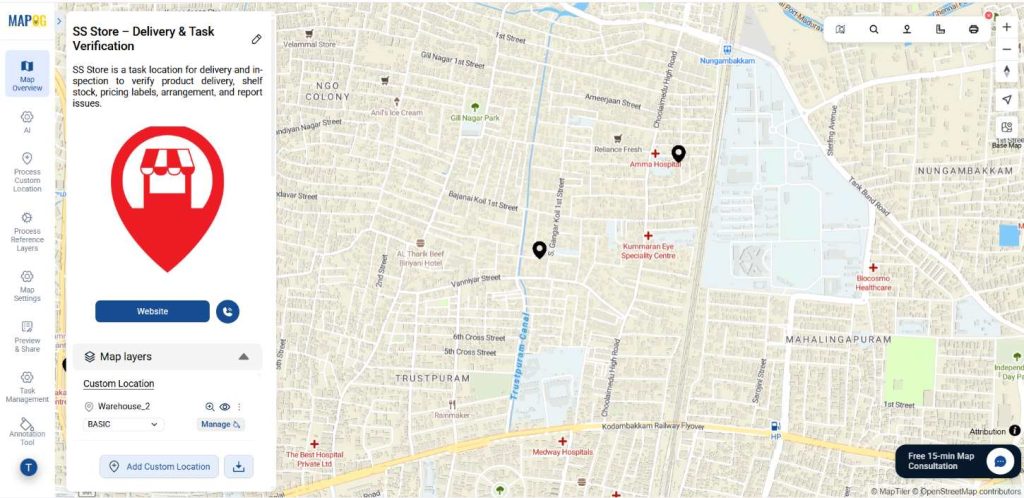
Go to Edit customer location details, then upload a suitable image for your point and fill other required attributes then click save.
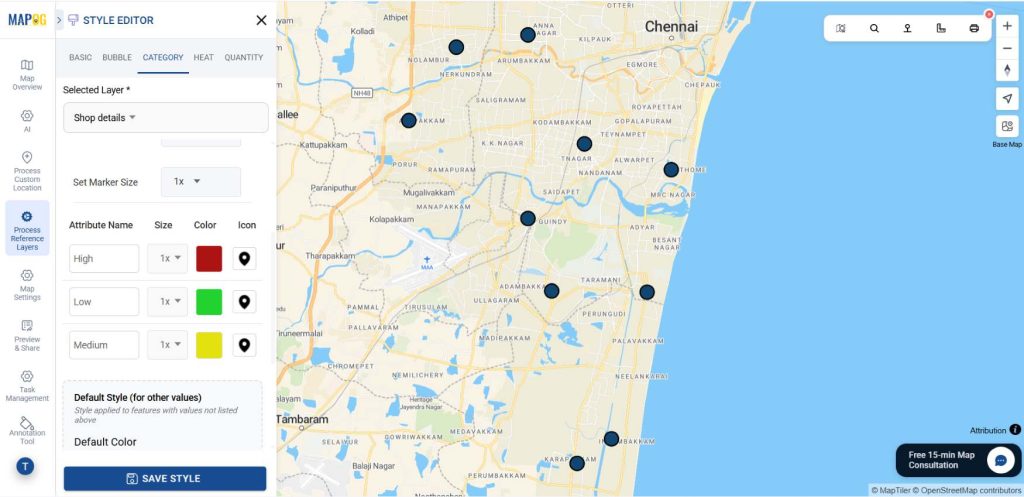
Step 3: Style Layers to Track Task Progress Clearly
After plotting, go to Add Layer Style, select Category, choose the layer (e.g., priority), assign colors, and click Save Layer. High-priority pending tasks will stand out instantly, making it easier for teams to track progress without manual filtering.
Follow the same procedure to add warehouse location and customer location also.
Filter:
Now go to the filter option, there you can find options such as age, house number, street, etc. Then select the layer which you want to filter, and apply.
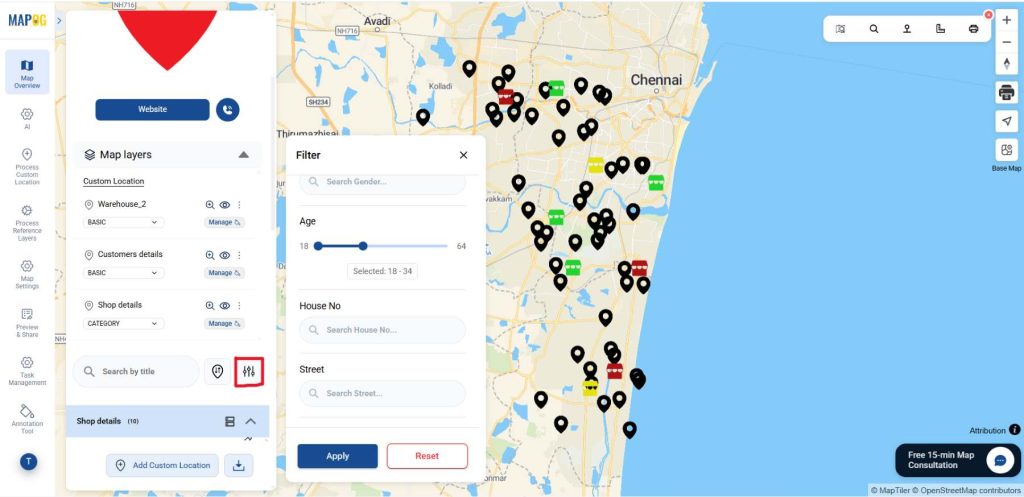
Now all the filtered customers locations come on map.
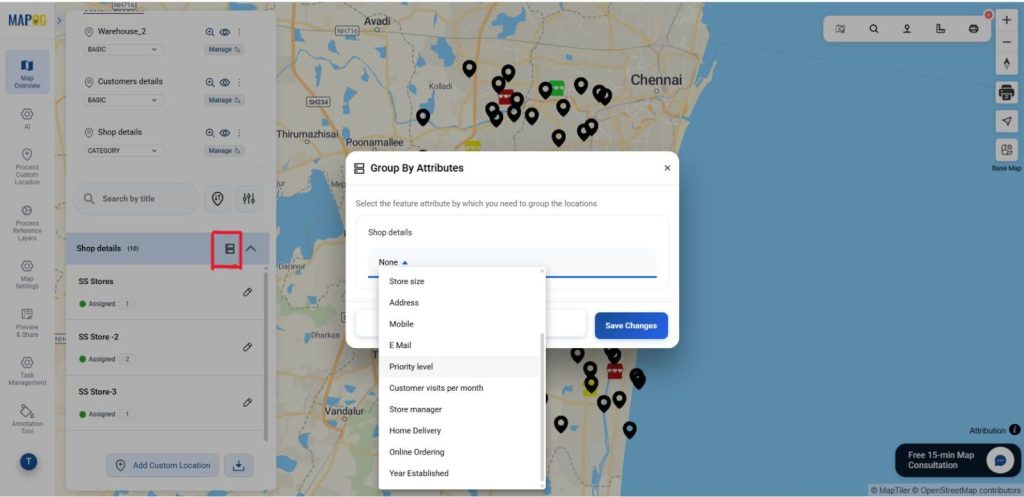
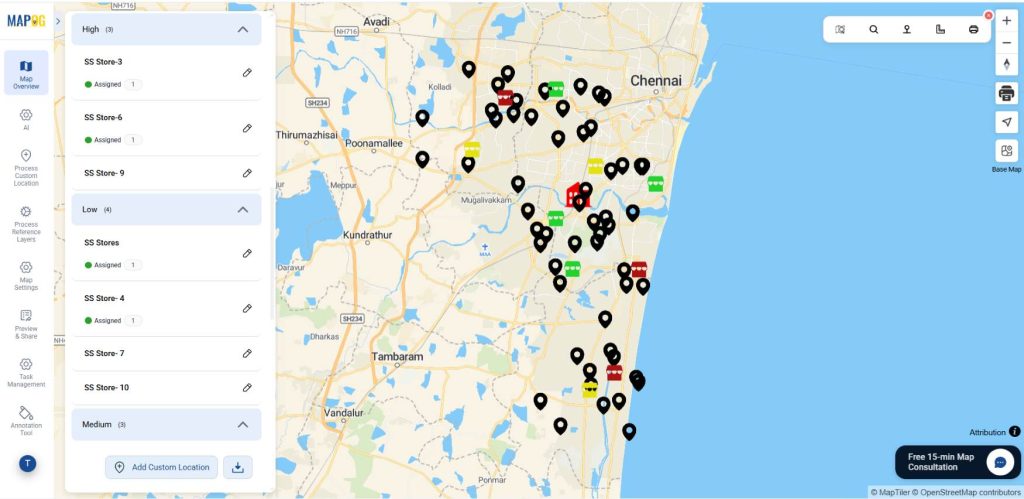
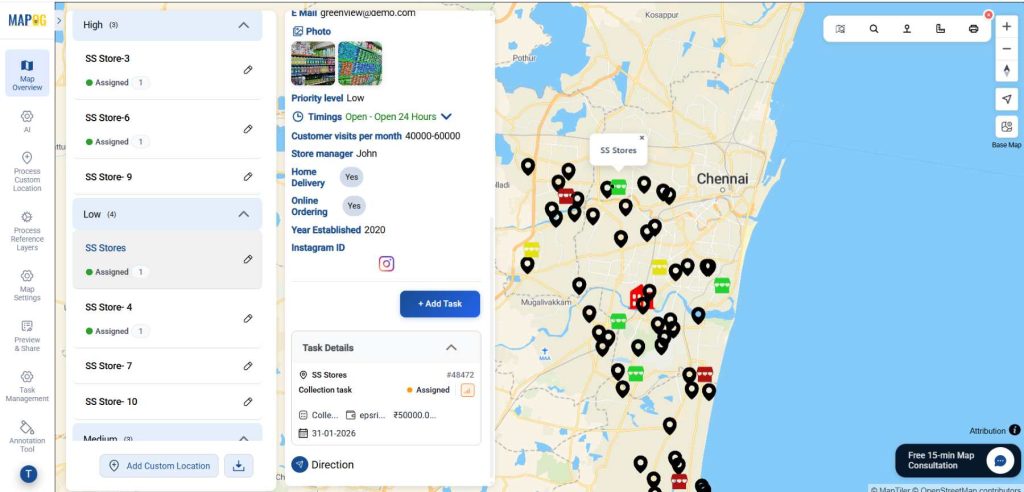
Group by attributes:
Open group by attributes option. Select the option which you want to group like property level. Then, give save changes, now you can see the tasks grouped into high, medium and low.
Step 4: Add Tasks and Completion Forms
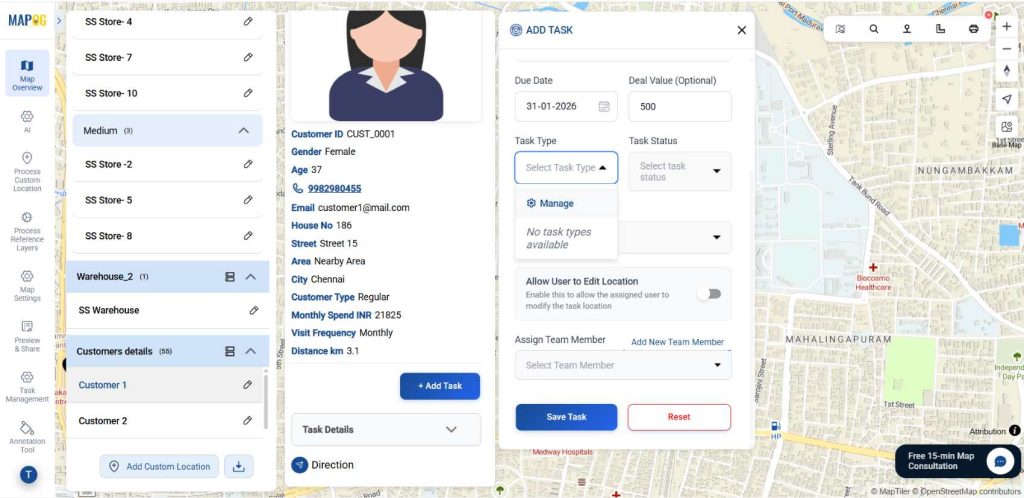
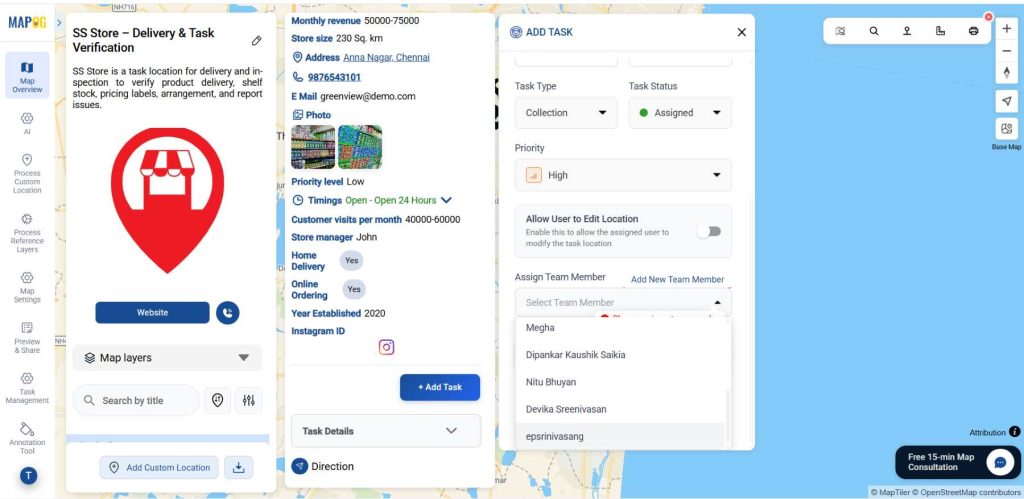
Now, go to any location of the store detail layer & click “Add Task” and then give task title, description, date, deal value, task type, task status and priority level for your map.
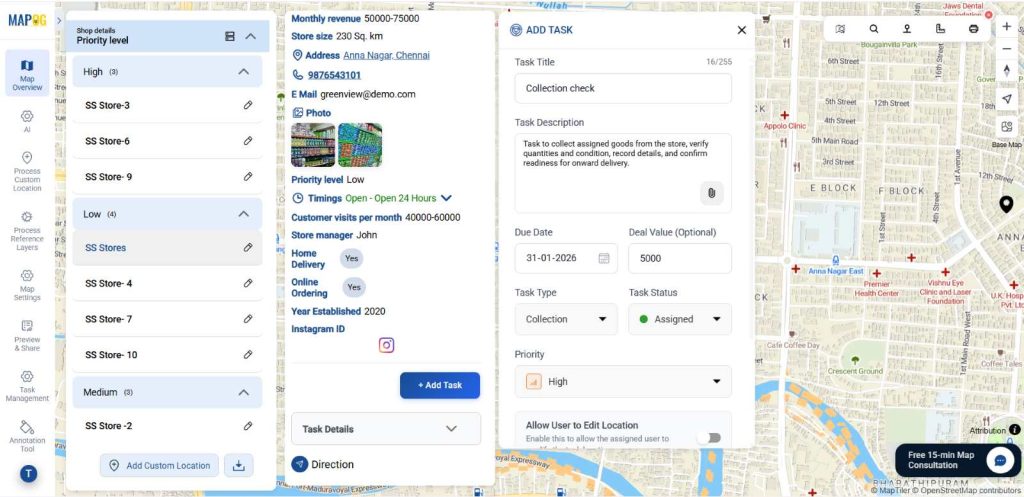
To add a new task type, click Task Type, select Manage, then choose Add More Task Type in the task type management section.
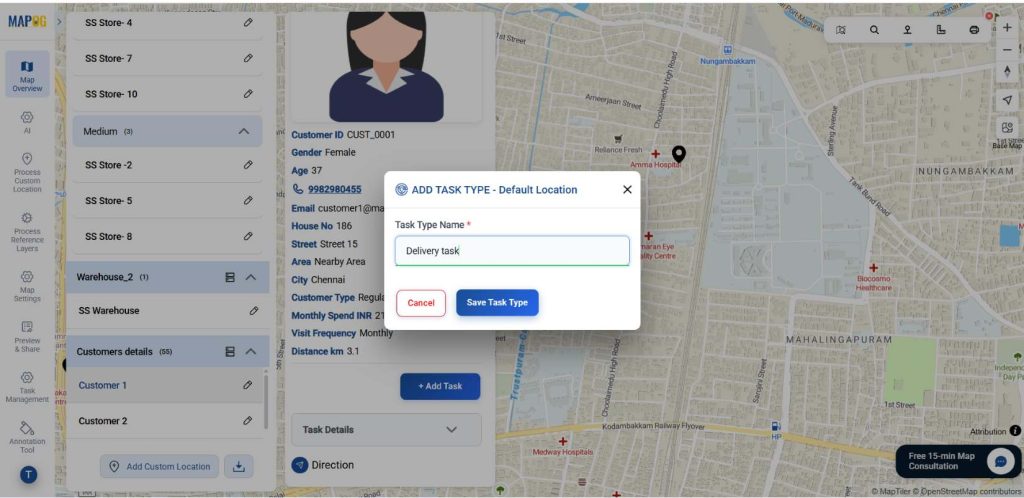
In the task type name option type your task name then give save task type to save you task.
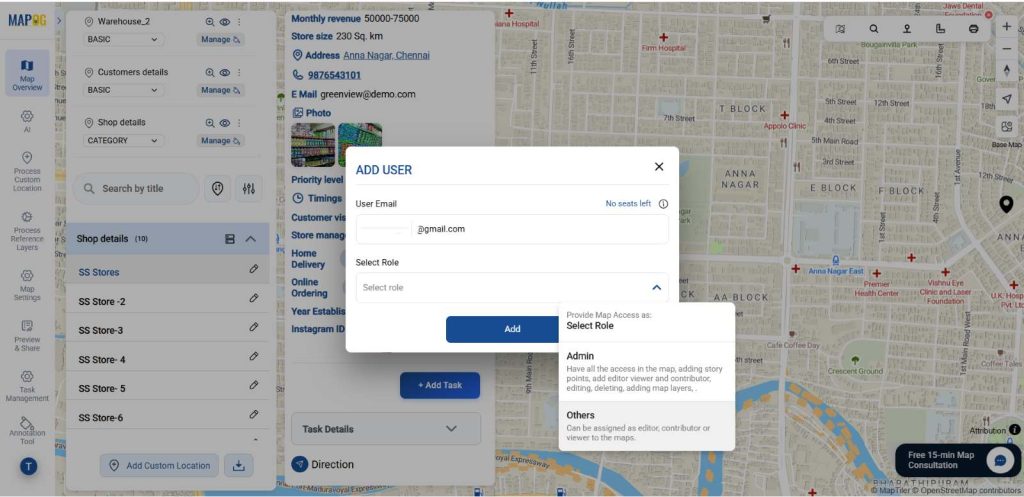
To add a new member go to the add new team member option, then the Add User table will open. Add the email address of the assignee. In the select role assign a role to the person as admin or others.
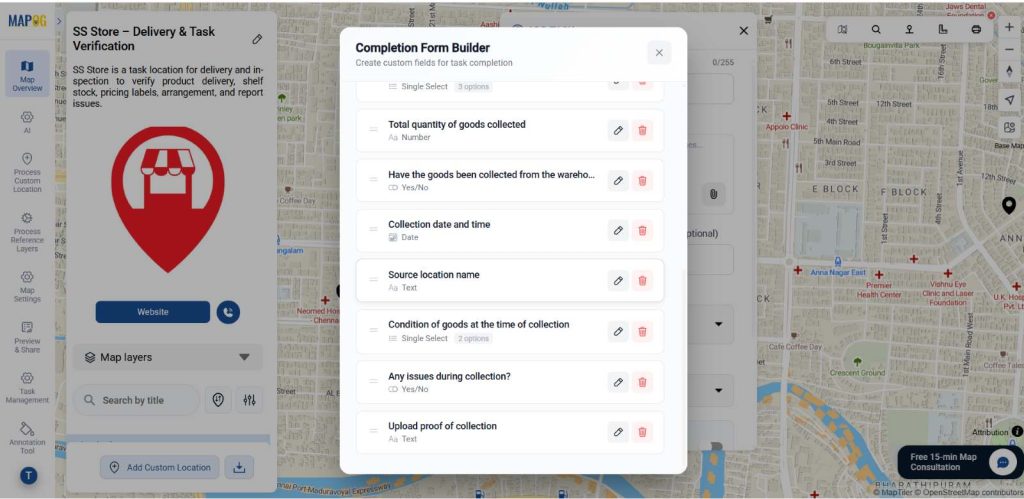
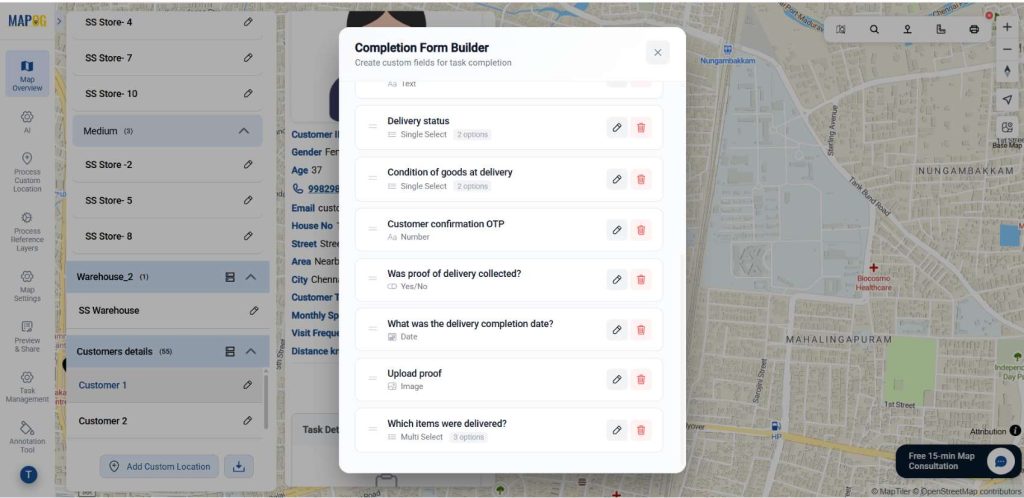
Click Assign Team Member to open the completion form. This helps managers collect consistent field data, track progress clearly, and ensure accountability for each task. Add relevant questions using field types like text, select, multiselect, and image.
Lastly, assign a team member from drop down to the task and save the task. Consequently, teams Track Progress through structured updates instead of informal messages.

In the same way add different kinds of completion forms to customer locations.
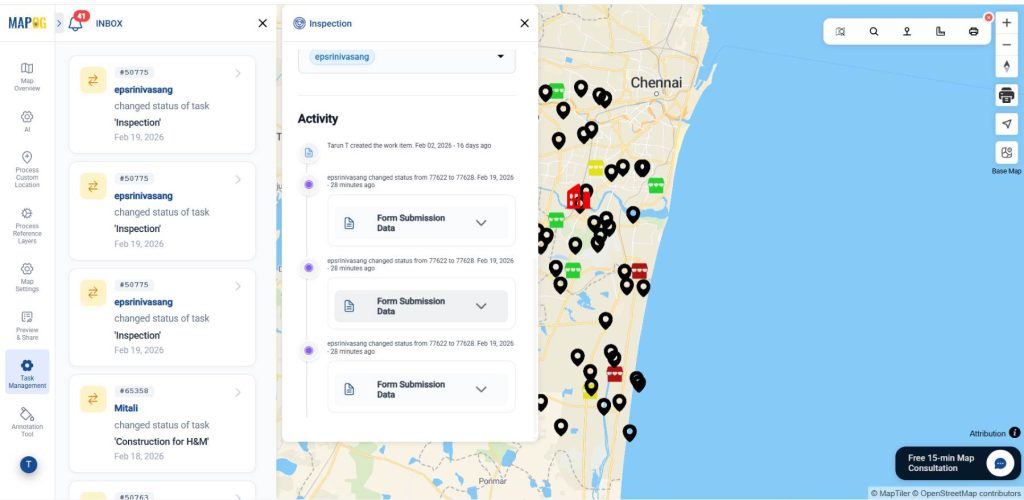
Once saved, assignees receive tasks in the MAPOG Contributor App, where they can comment, update status, complete the completion form and upload before-and-after images & submit.
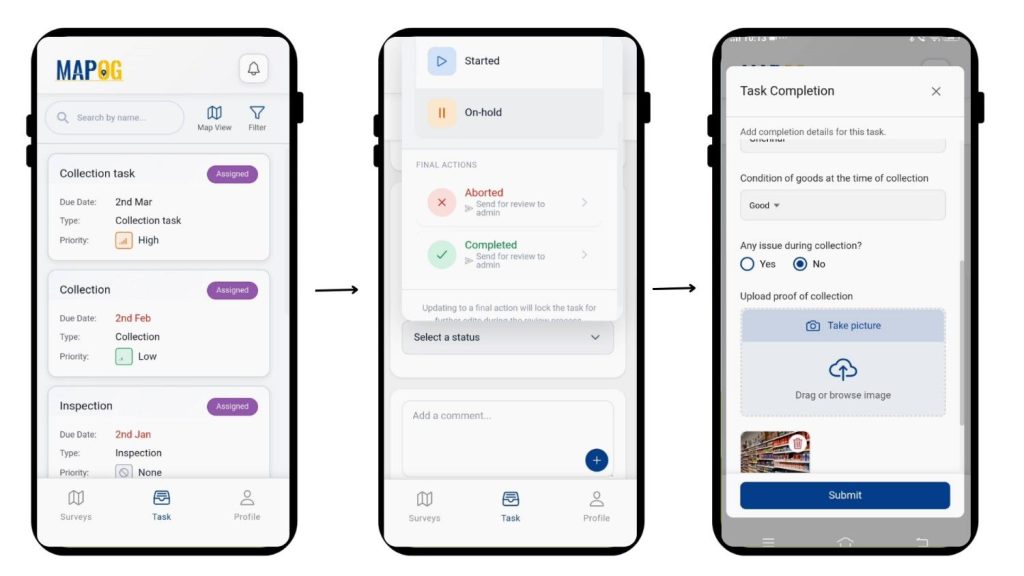
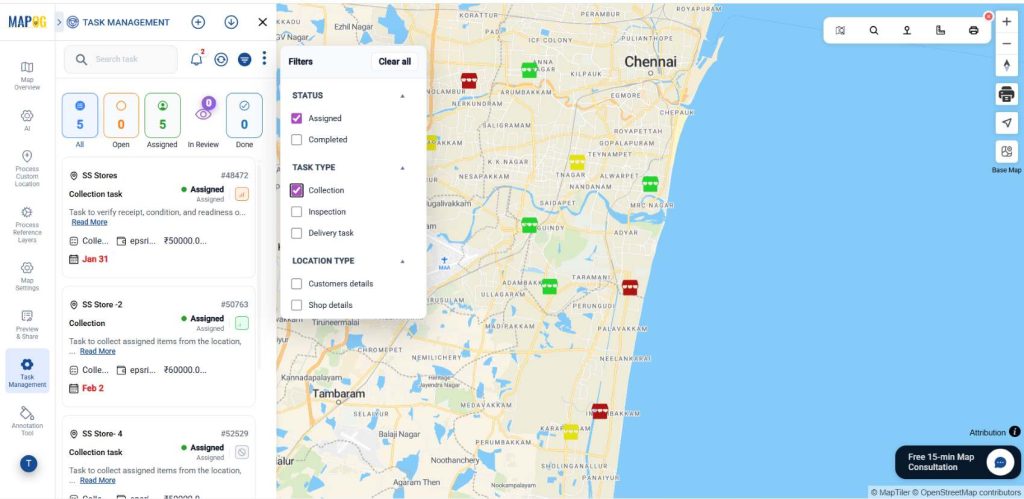
Progress updates are reflected live in the map’s Task management section, enabling real-time tracking. Use the Filter option to sort tasks as needed, and click Inbox to view comments related to each task.
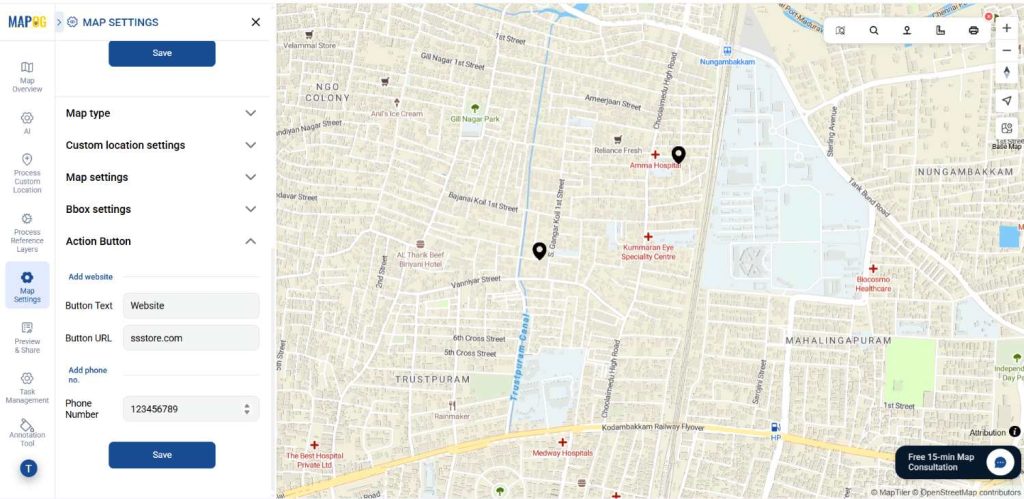
5. Add Call-to-action button:
After finishing your map, go to Map Settings and select the Action button. Add a label for the CTA (like “Visit Website” or “Contact Us”), attach a website URL for redirection, and include a mobile number to enable direct calling from the map.
Applications in Manage Retail Locations and Tasks
Store teams can track audits, stock checks, and readiness across locations, while visual teams manage updates and repairs directly on the map. Regional managers monitor performance in real time, expansion teams handle pre-opening tasks, and customers can view store details, get directions, or connect instantly.
Conclusion
Managing retail locations and tasks on a map transforms scattered operations into a clear, visual workflow. With MAPOG, retailers gain a real-time overview of every store and every task—connected spatially, updated instantly, and accessible securely.